Specification
| Item | Specification |
| Operating voltage (V) | 9 - 60 (12 cells) |
| Operating temperature [°C (°F)] | -35 to 75 (-31 to 167) |
| Insulated resistance (MΩ) | 10 (at 2 kV) |
Component
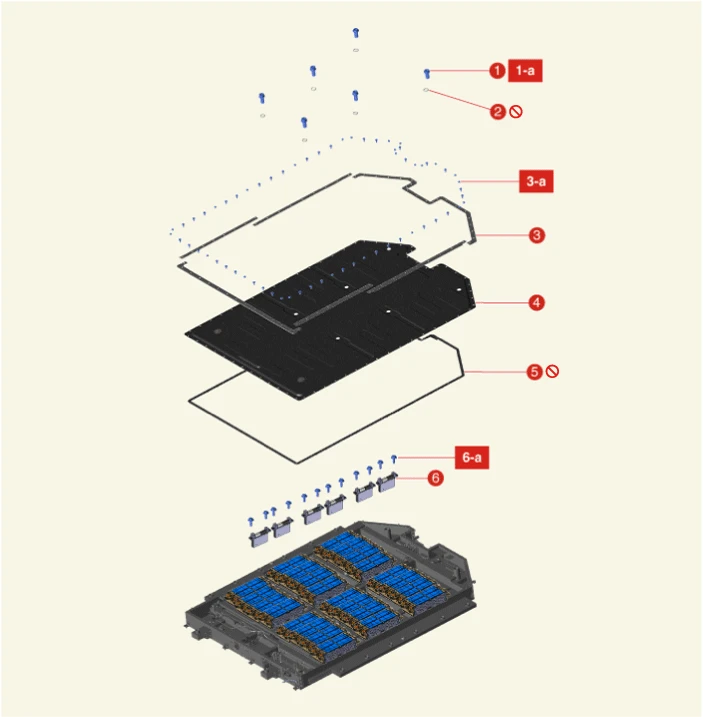
1. Upper Case Bolt
1-a. 103.0 - 154.9 N·m (10.5 - 15.8 kgf·m, 75.9 - 114.3 lb·ft)
2. O-ring
3. Watertight Bracket
3-a. 1st : 8.8 N·m (0.9 kgf·m, 6.5 lb·ft)
3-a. 2nd : 10.8 N·m (1.1 kgf·m, 8.0 lb·ft)
4. Upper Case
5. Waterproof Gasket
6. Cell Monitoring Unit (CMU)
6-a. 1st : 8.8 N·m (0.9 kgf·m, 6.5 lb·ft)
6-a. 2nd : 10.8 N·m (1.1 kgf·m, 8.0 lb·ft)
Cell Monitoring Unit (CMU) Connector and Terminal
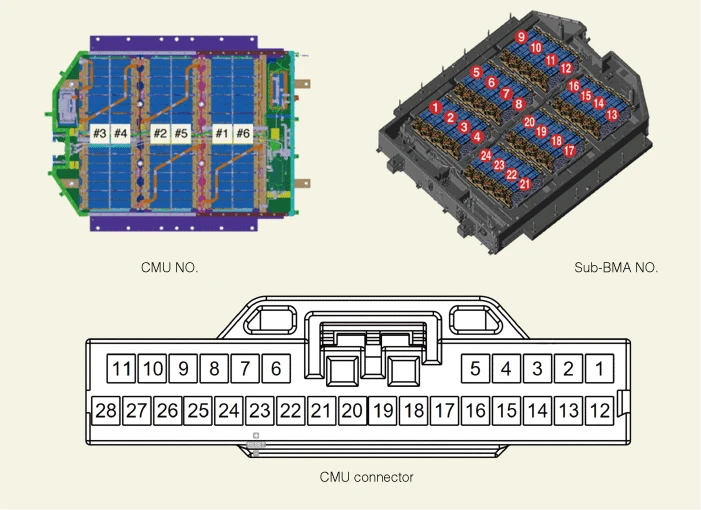
| Cell Monitoring Unit (CMU) | Module | Cell | Pins | In ETM |
| #1 | 1 | 1 | 1 - 12 | C0 - C1 |
| 2 | 1 - 13 | C1 - C2 | ||
| 3 | 2 - 13 | C2 - C3 | ||
| 4 | 2 - 14 | C3 - C4 | ||
| 5 | 3 - 14 | C4 - C5 | ||
| 6 | 3 - 15 | C5 - C6 | ||
| 2 | 7 | 4 - 15 | C6 - C7 | |
| 8 | 4 - 16 | C7 - C8 | ||
| 9 | 5 - 15 | C8 - C9 | ||
| 10 | 5 - 17 | C9 - C10 | ||
| 11 | 17 - 18 | C10 - C11 | ||
| 12 | 18 - 19 | C11 - C12 | ||
| 3 | 13 | 6 - 22 | C0 - C1 | |
| 14 | 6 -23 | C1 - C2 | ||
| 15 | 7 - 23 | C2 - C3 | ||
| 16 | 7 - 24 | C3 - C4 | ||
| 17 | 8 - 24 | C4 - C5 | ||
| 18 | 8 - 25 | C5 - C6 | ||
| 4 | 19 | 9 - 25 | C6 - C7 | |
| 20 | 9 - 26 | C7 - C8 | ||
| 21 | 10 - 26 | C8 - C9 | ||
| 22 | 10 - 27 | C9 - C10 | ||
| 23 | 11 - 27 | C10 - C11 | ||
| 24 | 11 - 28 | C11 - C12 | ||
| #2 | 5 | 25 | 1 - 12 | C0 - C1 |
| 26 | 1 - 13 | C1 - C2 | ||
| 27 | 2 - 13 | C2 - C3 | ||
| 28 | 2 - 14 | C3 - C4 | ||
| 29 | 3 - 14 | C4 - C5 | ||
| 30 | 3 - 15 | C5 - C6 | ||
| 6 | 31 | 4 - 15 | C6 - C7 | |
| 32 | 4 - 16 | C7 - C8 | ||
| 33 | 5 - 15 | C8 - C9 | ||
| 34 | 5 - 17 | C9 - C10 | ||
| 35 | 17 - 18 | C10 - C11 | ||
| 36 | 18 - 19 | C11 - C12 | ||
| 7 | 37 | 6 - 22 | C0 - C1 | |
| 38 | 6 -23 | C1 - C2 | ||
| 39 | 7 - 23 | C2 - C3 | ||
| 40 | 7 - 24 | C3 - C4 | ||
| 41 | 8 - 24 | C4 - C5 | ||
| 8 | 42 | 8 - 25 | C5 - C6 | |
| 43 | 9 - 25 | C6 - C7 | ||
| 44 | 9 - 26 | C7 - C8 | ||
| 45 | 10 - 26 | C8 - C9 | ||
| 46 | 10 - 27 | C9 - C10 | ||
| 47 | 11 - 27 | C10 - C11 | ||
| 48 | 11 - 28 | C11 - C12 | ||
| #3 | 9 | 49 | 1 - 12 | C0 - C1 |
| 50 | 1 - 13 | C1 - C2 | ||
| 51 | 2 - 13 | C2 - C3 | ||
| 52 | 2 - 14 | C3 - C4 | ||
| 53 | 3 - 14 | C4 - C5 | ||
| 54 | 3 - 15 | C5 - C6 | ||
| 10 | 55 | 4 - 15 | C6 - C7 | |
| 56 | 4 - 16 | C7 - C8 | ||
| 57 | 5 - 15 | C8 - C9 | ||
| 58 | 5 - 17 | C9 - C10 | ||
| 59 | 17 - 18 | C10 - C11 | ||
| 60 | 18 - 19 | C11 - C12 | ||
| 11 | 61 | 6 - 22 | C0 - C1 | |
| 62 | 6 -23 | C1 - C2 | ||
| 63 | 7 - 23 | C2 - C3 | ||
| 64 | 7 - 24 | C3 - C4 | ||
| 65 | 8 - 24 | C4 - C5 | ||
| 66 | 8 - 25 | C5 - C6 | ||
| 12 | 67 | 9 - 25 | C6 - C7 | |
| 68 | 9 - 26 | C7 - C8 | ||
| 69 | 10 - 26 | C8 - C9 | ||
| 70 | 10 - 27 | C9 - C10 | ||
| 71 | 11 - 27 | C10 - C11 | ||
| 72 | 11 - 28 | C11 - C12 | ||
| #4 | 13 | 73 | 1 - 12 | C0 - C1 |
| 74 | 1 - 13 | C1 - C2 | ||
| 75 | 2 - 13 | C2 - C3 | ||
| 76 | 2 - 14 | C3 - C4 | ||
| 77 | 3 - 14 | C4 - C5 | ||
| 78 | 3 - 15 | C5 - C6 | ||
| 14 | 79 | 4 - 15 | C6 - C7 | |
| 80 | 4 - 16 | C7 - C8 | ||
| 81 | 5 - 15 | C8 - C9 | ||
| 82 | 5 - 17 | C9 - C10 | ||
| 83 | 17 - 18 | C10 - C11 | ||
| 84 | 18 - 19 | C11 - C12 | ||
| 15 | 85 | 6 - 22 | C0 - C1 | |
| 86 | 6 -23 | C1 - C2 | ||
| 87 | 7 - 23 | C2 - C3 | ||
| 88 | 7 - 24 | C3 - C4 | ||
| 89 | 8 - 24 | C4 - C5 | ||
| 90 | 8 - 25 | C5 - C6 | ||
| 16 | 91 | 9 - 25 | C6 - C7 | |
| 92 | 9 - 26 | C7 - C8 | ||
| 93 | 10 - 26 | C8 - C9 | ||
| 94 | 10 - 27 | C9 - C10 | ||
| 95 | 11 - 27 | C10 - C11 | ||
| 96 | 11 - 28 | C11 - C12 | ||
| #5 | 17 | 97 | 1 - 12 | C0 - C1 |
| 98 | 1 - 13 | C1 - C2 | ||
| 99 | 2 - 13 | C2 - C3 | ||
| 100 | 2 - 14 | C3 - C4 | ||
| 101 | 3 - 14 | C4 - C5 | ||
| 102 | 3 - 15 | C5 - C6 | ||
| 18 | 103 | 4 - 15 | C6 - C7 | |
| 104 | 4 - 16 | C7 - C8 | ||
| 105 | 5 - 15 | C8 - C9 | ||
| 106 | 5 - 17 | C9 - C10 | ||
| 107 | 17 - 18 | C10 - C11 | ||
| 108 | 18 - 19 | C11 - C12 | ||
| 19 | 109 | 6 - 22 | C0 - C1 | |
| 110 | 6 -23 | C1 - C2 | ||
| 111 | 7 - 23 | C2 - C3 | ||
| 112 | 7 - 24 | C3 - C4 | ||
| 113 | 8 - 24 | C4 - C5 | ||
| 114 | 8 - 25 | C5 - C6 | ||
| 20 | 115 | 9 - 25 | C6 - C7 | |
| 116 | 9 - 26 | C7 - C8 | ||
| 117 | 10 - 26 | C8 - C9 | ||
| 118 | 10 - 27 | C9 - C10 | ||
| 119 | 11 - 27 | C10 - C11 | ||
| 120 | 11 - 28 | C11 - C12 | ||
| #6 | 21 | 121 | 1 - 12 | C0 - C1 |
| 122 | 1 - 13 | C1 - C2 | ||
| 123 | 2 - 13 | C2 - C3 | ||
| 124 | 2 - 14 | C3 - C4 | ||
| 125 | 3 - 14 | C4 - C5 | ||
| 126 | 3 - 15 | C5 - C6 | ||
| 22 | 127 | 4 - 15 | C6 - C7 | |
| 128 | 4 - 16 | C7 - C8 | ||
| 129 | 5 - 15 | C8 - C9 | ||
| 130 | 5 - 17 | C9 - C10 | ||
| 131 | 17 - 18 | C10 - C11 | ||
| 132 | 18 - 19 | C11 - C12 | ||
| 23 | 133 | 6 - 22 | C0 - C1 | |
| 134 | 6 -23 | C1 - C2 | ||
| 135 | 7 - 23 | C2 - C3 | ||
| 136 | 7 - 24 | C3 - C4 | ||
| 137 | 8 - 24 | C4 - C5 | ||
| 138 | 8 - 25 | C5 - C6 | ||
| 24 | 139 | 9 - 25 | C6 - C7 | |
| 140 | 9 - 26 | C7 - C8 | ||
| 141 | 10 - 26 | C8 - C9 | ||
| 142 | 10 - 27 | C9 - C10 | ||
| 143 | 11 - 27 | C10 - C11 | ||
| 144 | 11 - 28 | C11 - C12 |
On Vehicle Inspection

• When working on high voltage system, the work should be performed by technicians who have completed the relevant training. A lack of understanding of the high voltage system can lead to serious accidents due to electric shock or electric leakage.
• When working on high voltage system or related components, make sure that you are familiar and comply with the "Safety Precautions, Cautions and Warnings." If you do not comply with the instructions, serious accidents due to electric shock or leakage may occur.
• When working on high voltage system, make sure to check the Personal Protective Equipment (PPE) and high voltage shut-off procedures.
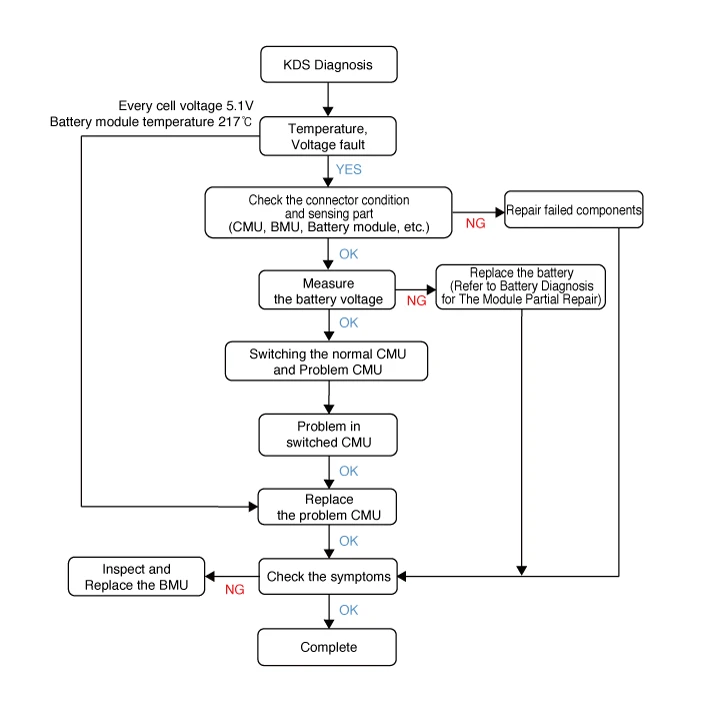
1.Check the sensor data with KDS.(Data Analysis → Battery Management System (BMS))

2.Check the sensing circuit [Cell Monitoring Unit (CMU), Battery Module Assembly (BMA), Battery Management Unit (BMU), Sensor Wiring) in case of cell voltage and battery module temperature related troubles.
3.If there is no trouble with the voltage and temperature sensing circuit, install it after exchanging faulty CMU and normal CMU with each other.
4.Check if the number of modules and cells in trouble has changed with the KDS.
5.If the module and cell number are changed, replace the CMU with a new one.
Removal

• When working on high voltage system, the work should be performed by technicians who have completed the relevant training. A lack of understanding of the high voltage system can lead to serious accidents due to electric shock or electric leakage.
• When working on high voltage system or related components, make sure that you are familiar and comply with the "Safety Precautions, Cautions and Warnings." If you do not comply with the instructions, serious accidents due to electric shock or leakage may occur.
• When working on high voltage system, make sure to check the Personal Protective Equipment (PPE) and high voltage shut-off procedures.

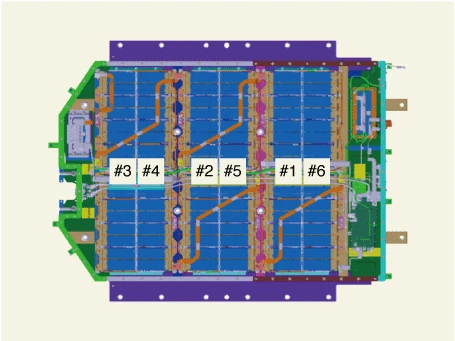
1.Remove the Battery System Assembly (BSA) upper case.(Refer to High Voltage Battery System - "Case")
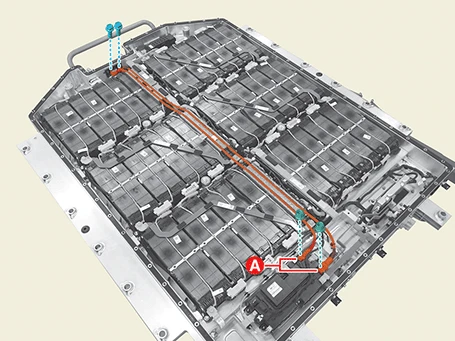
2.Remove the bus bar (A) after removing the bolt and nut.
Tightening torque :7.8 - 11.8 N·m (0.8 - 1.2 kgf·m, 5.8 - 8.7 lb·ft)
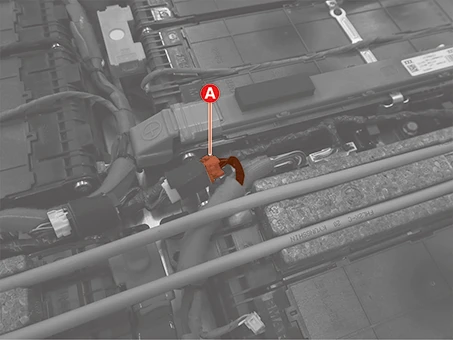
3.Disconnect the all Cell Monitoring Unit (CMU) distributor connector (A).

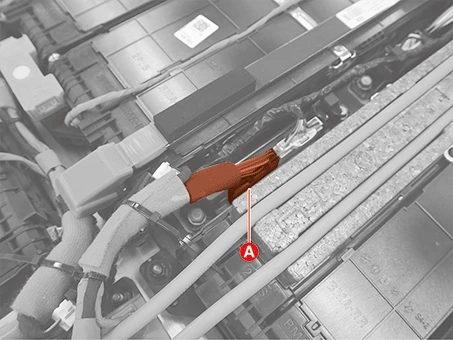
4.Disconnect the all CMU voltage sensing connector (A).

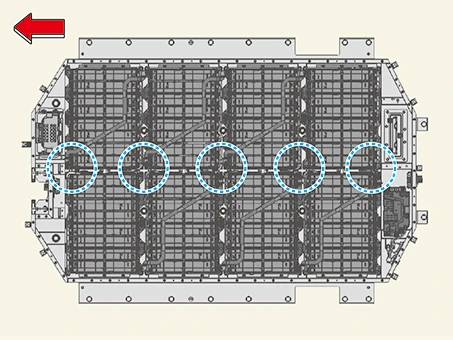
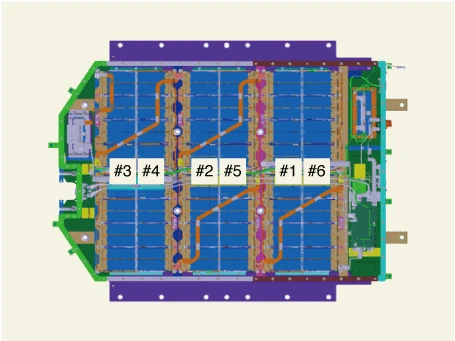
• When disconnecting CMU connector, follow the order from CMU#6>CMU#5>CMU#4>CMU#3>CMU#2>CMU#1.
• Even if only one CMU is defective, the above procedures must be followed when removing and replacing existing CMUs.
• Even if the CMU is replaced individually or testing by performing CMU swapping, all connectors must be disconnected in order.
• The black connector on CMU is voltage sensing connector.
• Refer to the image below for the CMU number.
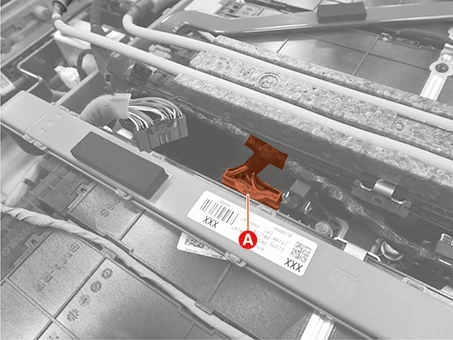
5.Disconnect the asynchronous communication connector (A) of the CMU.
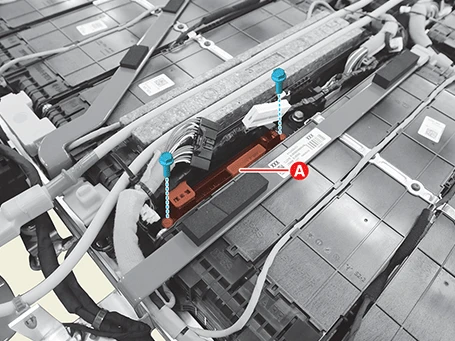
6.Lift the CMU (A) after removing the bolts.
Tightening torque1st : 8.8 N·m (0.9 kgf·m, 6.5 lb·ft)2nd : 10.8 N·m (1.1 kgf·m, 8.0 lb·ft)
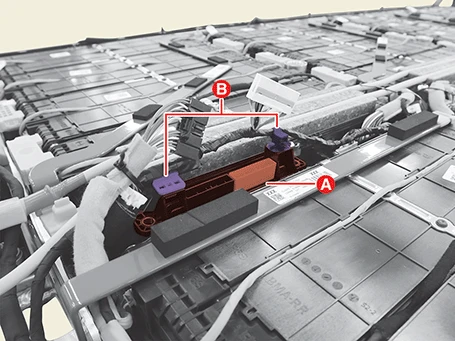
7.Remove the CMU (A) by separating the wiring clips (B).
Installation

• When working on high voltage system, the work should be performed by technicians who have completed the relevant training. A lack of understanding of the high voltage system can lead to serious accidents due to electric shock or electric leakage.
• When working on high voltage system or related components, make sure that you are familiar and comply with the "Safety Precautions, Cautions and Warnings." If you do not comply with the instructions, serious accidents due to electric shock or leakage may occur.
• When working on high voltage system, make sure to check the Personal Protective Equipment (PPE) and high voltage shut-off procedures.
1.Install in the reverse order of removal.

• Install the Cell Monitoring Unit (CMU) to the specified torque.
• If the CMU is dropped, it may cause internal damage. (Do not reuse)
• When assembling the battery, install in the order of the lowest potential (BMA No. 1) and the highest potential (BMA No. 24), i.e., CMU#1>CMU#2>CMU#3>CMU#4>CMU#5>CMU#6.
2.Perform the High Voltage Battery Pack Connector Check with the KDS before installing the Battery System Assembly (BSA) upper case.(S/W Management → Battery Management System (BMS) → High Voltage Battery Pack Connector Check)
