Removal

• When working on high voltage system, the work should be performed by technicians who have completed the relevant training. A lack of understanding of the high voltage system can lead to serious accidents due to electric shock or electric leakage.
• When working on high voltage system or related components, make sure that you are familiar and comply with the "Safety Precautions, Cautions and Warnings." If you do not comply with the instructions, serious accidents due to electric shock or leakage may occur.
• When working on high voltage system, make sure to check the Personal Protective Equipment (PPE) and high voltage shut-off procedures.

1.Shut off the high voltage circuit.(Refer to Heating, Ventilation and Air Conditioning - "High Voltage Shut off Procedure")
2.Recover the refrigerant with recovery/recycling/charging equipment.(Refer to Air Conditioning - "Refrigerant Recovery/Recycling/Charging/Evacuation")
3.Remove the front trunk.(Refer to Body - "Front Trunk")
4.Disconnect the air conditioner pressure transducer connector.(Refer to Air Conditioning - Air Conditioning Pressure Transducer)
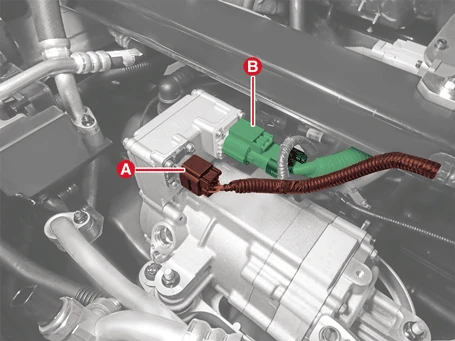
5.Disconnect the compressor ECV connector (A) and compressor high voltage connector (B).
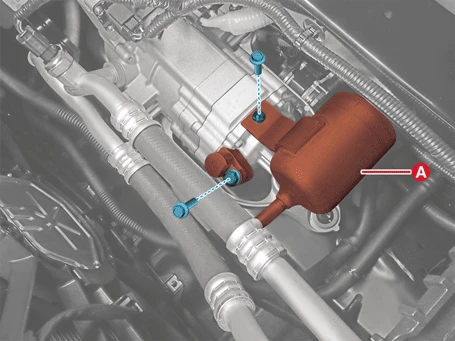
6.Separate the discharge hose (A) after removing the bolts.
Tightening torque :21.6 - 32.4 N·m (2.2 - 3.3 kgf·m, 15.9 - 23.9 lb·ft)
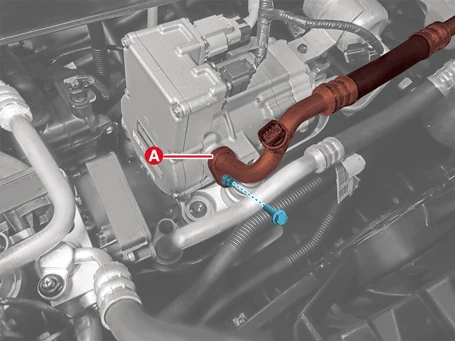
7.Separate the suction pipe assembly 2 (A) after removing the bolt.
Tightening torque :21.6 - 32.4 N·m (2.2 - 3.3 kgf·m, 15.9 - 23.9 lb·ft)
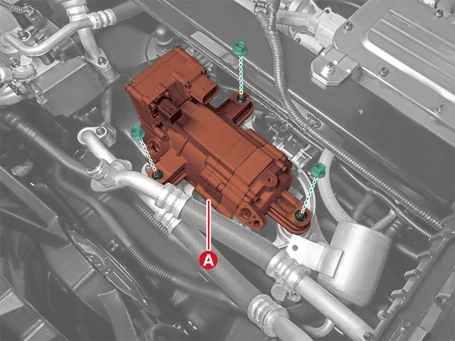
8.Remove the electric air conditioner compressor (A) after removing the nuts.
Tightening torque :19.6 - 33.3 N·m (2.0 - 3.4 kgf·m, 14.5 - 24.6 lb·ft)
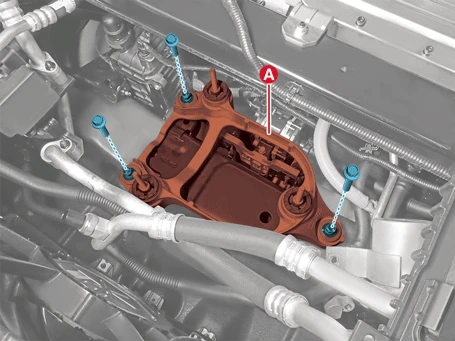
9.Remove the compressor bracket (A) after removing the bolts.
Tightening torque :19.6 - 33.3 N·m (2.0 - 3.4 kgf·m, 14.5 - 24.6 lb·ft)
Installation

• When working on high voltage system, the work should be performed by technicians who have completed the relevant training. A lack of understanding of the high voltage system can lead to serious accidents due to electric shock or electric leakage.
• When working on high voltage system or related components, make sure that you are familiar and comply with the "Safety Precautions, Cautions and Warnings." If you do not comply with the instructions, serious accidents due to electric shock or leakage may occur.
• When working on high voltage system, make sure to check the Personal Protective Equipment (PPE) and high voltage shut-off procedures.
1.Install in reverse order of removal.

Removal

• When working on high voltage system, the work should be performed by technicians who have completed the relevant training. A lack of understanding of the high voltage system can lead to serious accidents due to electric shock or electric leakage.
• When working on high voltage system or related components, make sure that you are familiar and comply with the "Safety Precautions, Cautions and Warnings." If you do not comply with the instructions, serious accidents due to electric shock or leakage may occur.
• When working on high voltage system, make sure to check the Personal Protective Equipment (PPE) and high voltage shut-off procedures.
1.Shut off the high voltage circuit.(Refer to Heating, Ventilation and Air Conditioning - "High Voltage Shut off Procedure")
2.Recover the refrigerant with recovery/recycling/charging equipment.(Refer to Air Conditioning - "Refrigerant Recovery/Recycling/Charging/Evacuation")
3.Remove the auxiliary 12 V battery tray.(Refer to Battery Control System - "Auxiliary Battery (12 V)")
4.Disconnect the air conditioner pressure transducer connector.(Refer to Air Conditioning - Air Conditioning Pressure Transducer)
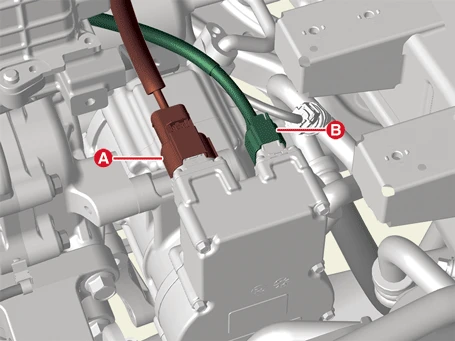
5.Disconnect the compressor high voltage connector (A) and compressor ECV connector (B).
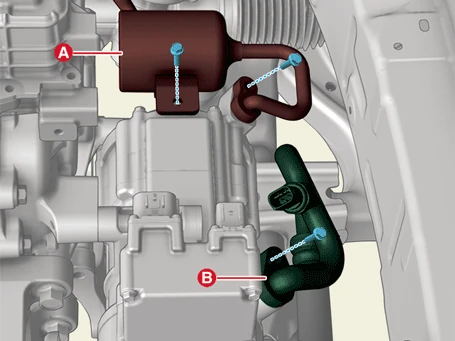
6.Separate the discharge hose (A) and suction hose 2 (B) after removing the bolts.
Tightening torque :21.6 - 32.4 N·m (2.2 - 3.3 kgf·m, 15.9 - 23.9 lb·ft)

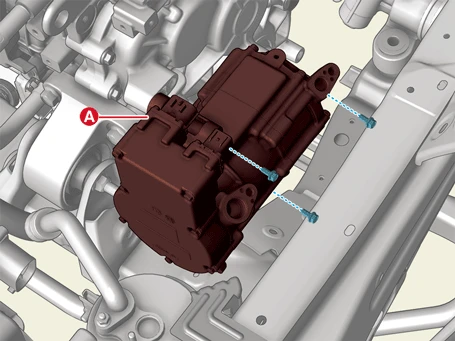
7.Remove the electric air conditioner compressor (A) after removing the bolts.
Tightening torque : 19.6 - 33.3 N·m (2.0 - 3.4 kgf·m, 14.5 - 24.6 lb·ft)
Installation

• When working on high voltage system, the work should be carried by technicians who have completed the relevant training. A lack of understanding of the high voltage system can lead to serious accidents due to electric shock or electric leakage.
• When working on high voltage system or related components, make sure that you are familiar and comply with the "Safety Precautions, Cautions and Warnings." If you do not comply with the instructions, serious accidents due to electric shock or leakage may occur.
• When working on high voltage system, make sure to check the Personal Protective Equipment (PPE) and high voltage shut-off procedures.
1.Install in reverse order of removal.

Inspection
Electric compressor body inspection
1.How to check the internal failure of the electric compressor body.
(1)Remove the low pressure pipe on the electric compressor side.
(2)Check for contamination of copper wire and white thread inside the compressor.
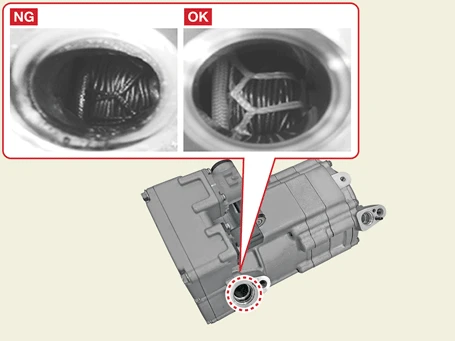
2.To check the compressor motor, measure the resistance value of the 3-phase power pin.
(1)If the 3-phase resistance value is abnormal, the motor is faulty, so replace the electric compressor body.
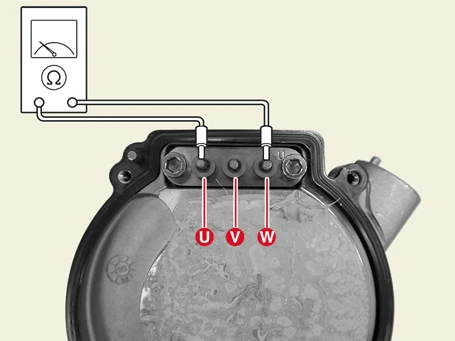
| Item | U-V phase | V-W phase | U-W phase |
| Normal Resistance Value (Ω) | 0.4 - 0.5 | ||
| Abnormal Resistance Value (Ω) | 0 | ||
Electric compressor inverter inspection
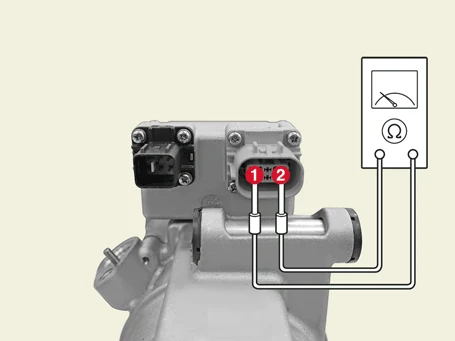
1.How to check the pin failure of the electric compressor inverter.
(1)High voltage pin
Normal resistance value : 100 Ω or moreAbnormal resistance value : 100 Ω or less
(2)Low voltage pin
1)CAN HIGH/LOW resistance measurement- Measure terminals 3-6.
Normal resistance value : Approx. 120 ΩAbnormal resistance value : Short (about 0 Ω or more than 1 kΩ)
2)CAN-GND resistance measurement- Measure the 2rd - 6th / 2rd - 3th terminal.
Normal resistance value : 1 MΩAbnormal resistance value : Short (approx. 0 Ω)
3)Interlock ( + )/( - ) resistance measurement (Measure terminals 1-4 (B) after connecting high voltage connector (A))
Normal resistance value : 1.0 Ω or lessAbnormal resistance value : ∞ MΩ
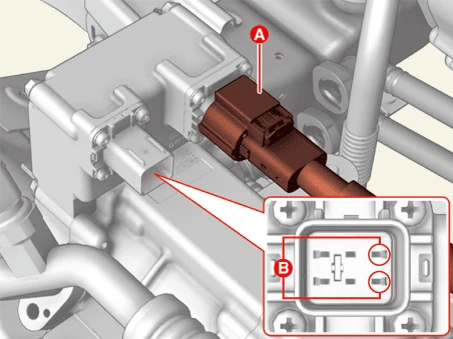

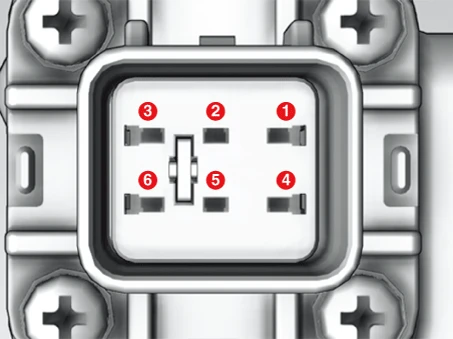
| Pin number | Function | Pin number | Function |
| 1 | Interlock ( - ) | 4 | Interlock ( + ) |
| 2 | GND 12 V | 5 | IG 12 V |
| 3 | CAN Low | 6 | CAN High |
(3)Compressor Insulation Resistance
Normal resistance value : more than 100 MΩ (@500 Vdc, no refrigerant)
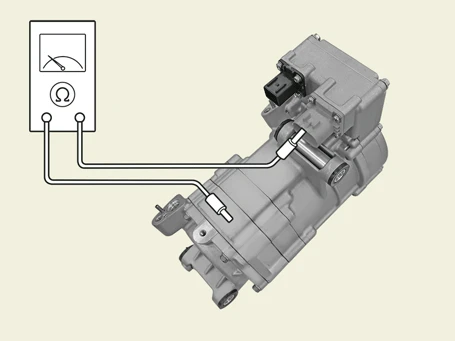
Disassembly

• When working on high voltage system, the work should be performed by technicians who have completed the relevant training. A lack of understanding of the high voltage system can lead to serious accidents due to electric shock or electric leakage.
• When working on high voltage system or related components, make sure that you are familiar and comply with the "Safety Precautions, Cautions and Warnings." If you do not comply with the instructions, serious accidents due to electric shock or leakage may occur.
• When working on high voltage system, make sure to check the Personal Protective Equipment (PPE) and high voltage shut-off procedures.
1.Remove the electric A/C compressor.(Refer to Electric A/C Compressor - "Removal and Installation - 2WD")(Refer to Electric A/C Compressor - "Removal and Installation - 4WD")
2.The inverter/body kit is an electronic component and is easily damaged by dust and moisture, so move it to a clean room.

• Remove dust or dirt from the exterior of the compressor to prevent contamination of the inverter/body kit.
• In order to prevent contamination of new inverter/body kits, do not open the packaging until just before installation.
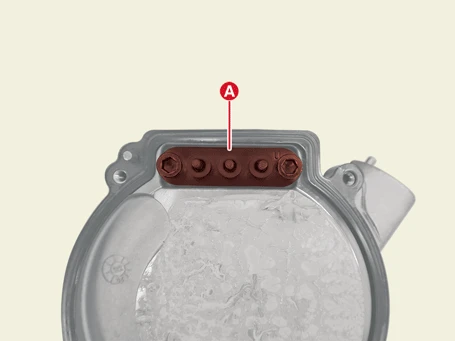
3.Remove the bolt (A) that fixes the inverter/body kit.

• The inverter/body kit fastening bolts are not to be reused.
• Never remove bolts not marked.
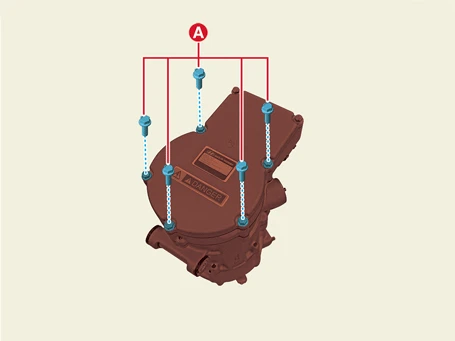
4.Separate the inverter kit (A) and the body kit (B).
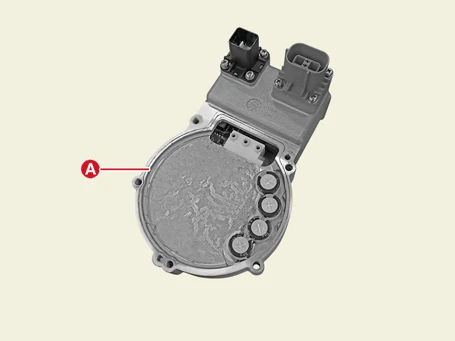

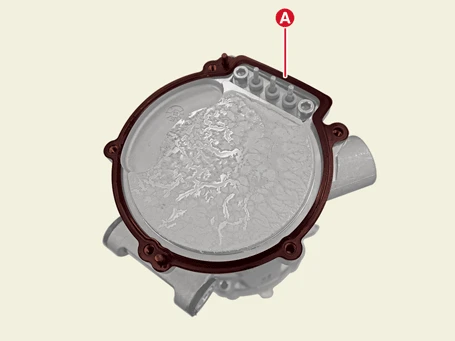
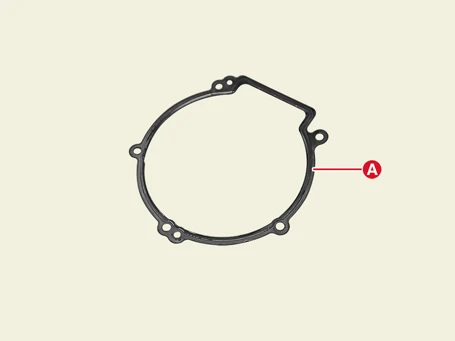
5.Remove the inverter/body kit gasket (A).

• Do not reuse gasket.
• When removing the gasket, do not use sharp tools and be careful about damage.
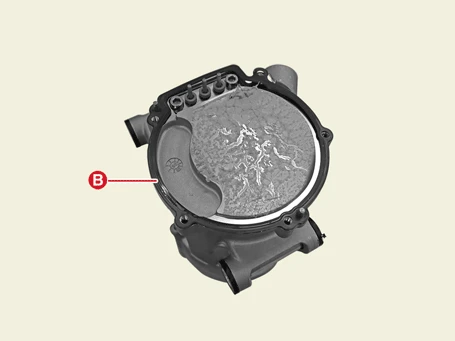
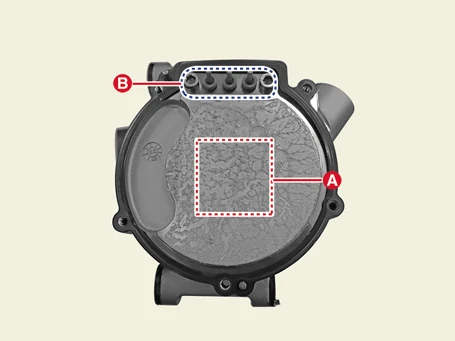
6.Before replacing with a new inverter/body kit, apply thermal grease as shown in the picture below.
Quantity : Apply 3 - 4 g (compressor heat sink part)

• When replacing the inverter/body kit, be careful of static electricity and work in a clean room [consistent temperature and humidity: 22°C (71.6°F) - 23°C (73.4°F), 50%].
• General grease cannot be used, and the supplied thermal grease must be used.
• When applying thermal grease, wipe off foreign substances in the grease with alcohol.
• When working, align with the grease application area (A) and work carefully so that foreign substances do not enter the 3-phase power pin (B).
• When replacing the inverter or body kit, it is recommended to wipe off the existing thermal grease and apply the supplied thermal grease.
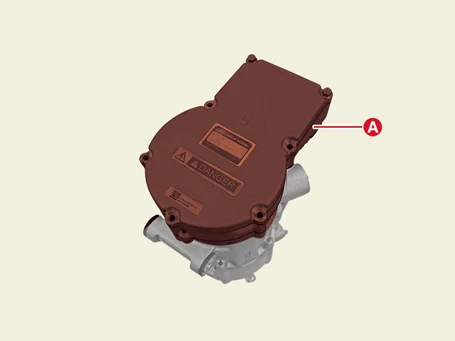
7.Install the new gasket and install the inverter kit (A) into the body kit, taking care not to damage the 3-phase power pin.

• When installing the inverter kit and body kit, be careful about breakage and distortion/bending of the 3-phase power pin.
• Inverter kit and body kit gaskets are not to be reused.
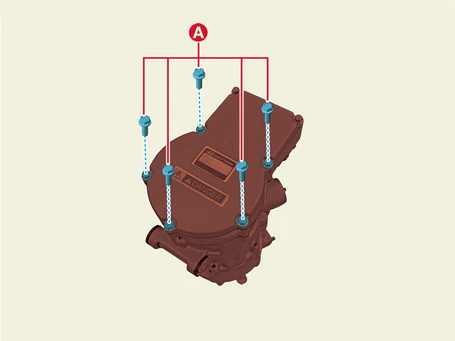
8.Assemble the inverter kit and body kit by tightening the new bolts (A).
Tightening torque :5.9 - 6.9 N·m (0.6 - 0.7 kgf·m, 4.3 - 5.1 lb·ft, 52.1 - 60.8 lb·in)

• When installing the inverter kit and body kit, be careful as the internal PCB of the inverter/body kit may be bent due to vehicle vibration when over-torque or under-torque is installed.
• Do not reuse inverter kit and body kit fastening bolts.
Reassembly

• When working on high voltage system, the work should be performed by technicians who have completed the relevant training. A lack of understanding of the high voltage system can lead to serious accidents due to electric shock or electric leakage.
• When working on high voltage system or related components, make sure that you are familiar and comply with the "Safety Precautions, Cautions and Warnings." If you do not comply with the instructions, serious accidents due to electric shock or leakage may occur.
• When working on high voltage system, make sure to check the Personal Protective Equipment (PPE) and high voltage shut-off procedures.
1.Reassemble in the reverse order of disassembly.