manager@kiaev6.org (915) 212-77133

Kia EV6: Repair procedures

Adjustment

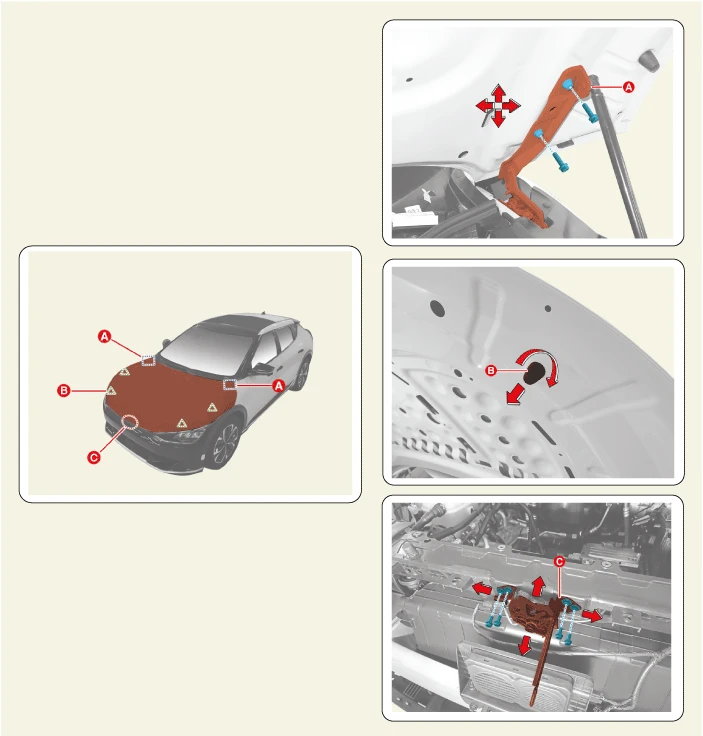
1.Loosening the mounting bolts of the hood hinge (A)

2.Adjust the hood by moving it up and down or from side to side and tighten the bolt.

3.Adjust the height of the hood by turning the overslam bumper (B) clockwise and counterclockwise.

4.Loosen the bolts of the hood latch (C), adjust the hood latch by moving it up and down or from side to side and tighten the bolt.

5.When the hood is closed after completion of adjustment, check if there is an iron noise when the front hood latch area of the hood assembly outer plate is tapped. If there is iron noise, increase the overlap by adjusting the two hood overslam bumpers down one quarter to a half of a turn.
Kia EV6. Repair procedures

    Previous pageComponents and Components Location

    Component 1. Hood Assembly 1-a. 18.6 - 24.5 N·m (1.9 - 2.5 kgf·m, 13.7 - 18.1 lb·ft) 2. Hood Insulator Pad 3. Hood Lifter 4. Hood Hinge 5. Hood Latch Release Handle 6. Hood Latch R ...

    PREV

    Next pageHood Assembly

    Removal     Removing or installing the hood requires an assistant. 1.Remove the hood lifter (B) after removing the clip (A). 2.Remove the hood assembly (A) after removing the ...

    NEXT
    Other information:

    Kia EV6 (CV) 2022– Workshop Manual: Cowl Side Trim
    Removal 1.Remove the front door scuff trim.(Refer to Body - "Door Scuff Trim") 2.Remove the hood latch release handle.(Refer to Hood - "Hood Latch Release Handle") 3.Remove the cowl side trim (A).     Clip position : Installation 1.Install in t ...

    Kia EV6 (CV) 2022– Workshop Manual: Diagnosis Guide for Each Condition of Accident Vehicle
    Diagnosis Guide for Each Condition of Accident Vehicle     • The Electric Vehicle comes equipped with a high voltage battery that can cause serious injury, like electric shocks, or even death when malfunctioning or mishandled, so follow manual below. • This guide is inten ...