Component
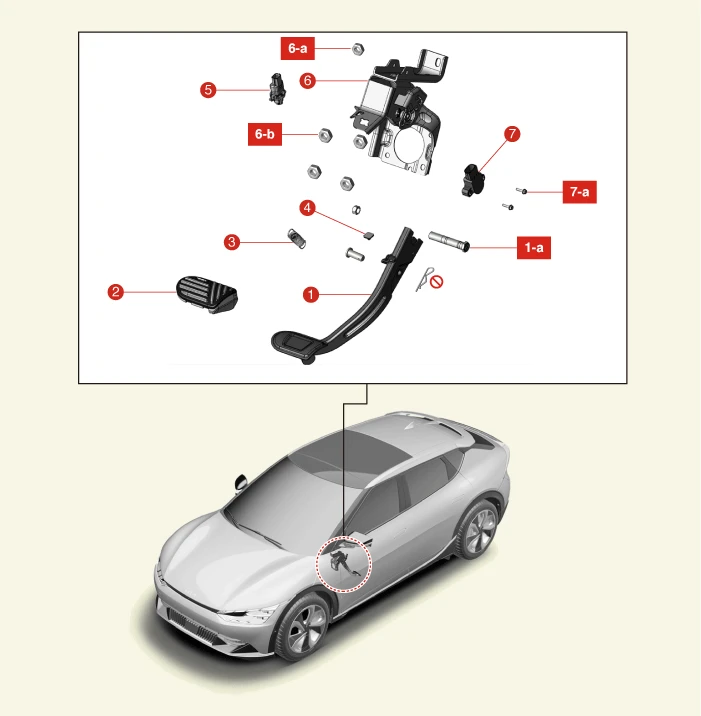
1. Brake Pedal Arm
1-a. 24.5 - 34.3 N·m (2.5 - 3.5 kgf·m, 18.1 - 25.3 lb·ft)
2. Brake Pedal Pad
3. Return Spring
4. Stopper
5. Stop Lamp Switch
6. Brake Pedal Member Assembly
6-a. 16.7 - 25.5 N·m (1.7 - 2.6 kgf·m, 12.3 - 18.8 lb·ft)
6-b. 12.7 - 17.7 N·m (1.3 - 1.8 kgf·m, 9.4 - 13.0 lb·ft)
7. Pedal Stroke Sensor
7-a. 2 - 3.9 N·m (0.2 - 0.4 kgf·m, 1.4 - 2.9 lb·ft)
Description and Operation
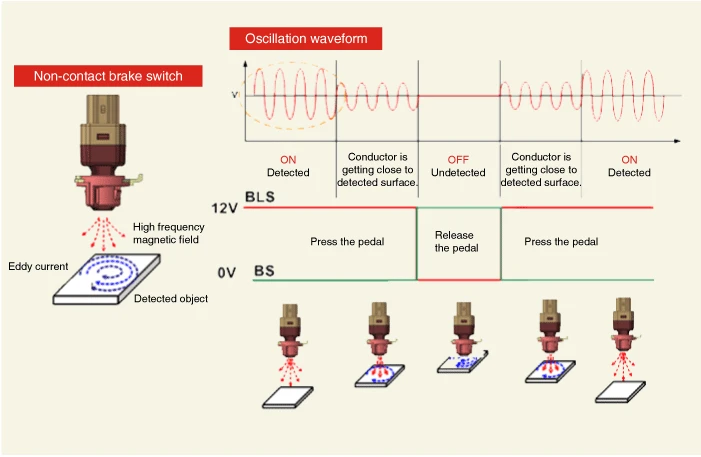
Operation principle of inductive non-contact switch
1.Use the high frequency magnetic field and the induced current that are generated by oscillation (to approved voltage) of coil in switch.
2.The eddy current is generated on surface of metal by self inductance effect if there is metal in high frequency magnetic field.
3.The eddy current that is generated decreases the high frequency magnetic field as much as amount of generated by disturbing the switch's magnetic flux.
4.ON- OFF by determining whether high voltage magnetic field decreases or not(calculate the voltage difference by length between metal and coil).
Schematic Diagram
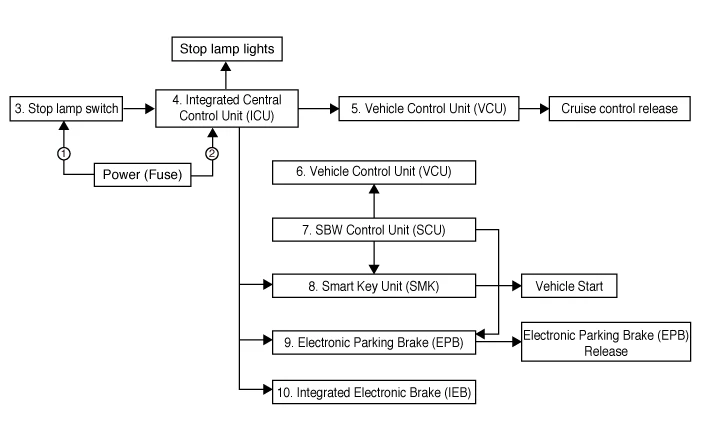
System Diagram
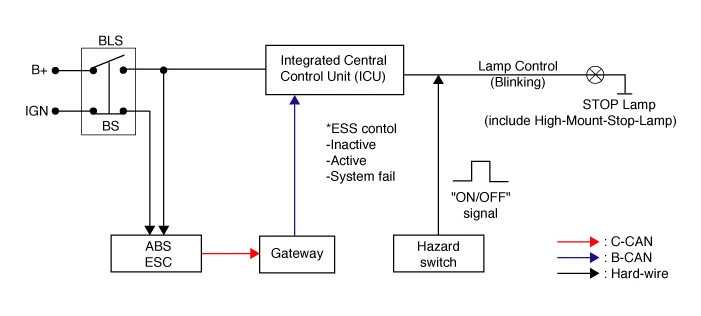
Troubleshooting
1.Part diagnosis
| Name | Suspected Cause | Symptom | Correction | |||||||||
| Switch fuse | Faulty fuse connection, Damaged fuse |
|
 A waveform inspection is performed using
an oscilloscope on each part during vehicle acceleration/braking. (Refer
to stop lamp switch circuit inspection procedures) A waveform inspection is performed using
an oscilloscope on each part during vehicle acceleration/braking. (Refer
to stop lamp switch circuit inspection procedures) Refer to the relevant repair procedures
of the part when something abnormal is discovered in the waveform (Refer
to the repair procedures of the relevant part and if necessary replace it) Refer to the relevant repair procedures
of the part when something abnormal is discovered in the waveform (Refer
to the repair procedures of the relevant part and if necessary replace it) |
|||||||||
| Relay fuse | Faulty fuse connection, Damaged fuse |
|
||||||||||
| Stop lamp switch |
|
|
||||||||||
| Stop signal electronic module (If it applies) |
|
|||||||||||
| Vehicle Control Unit (VCU) |
|
|||||||||||
| Integrated Body Control Unit (IBU) |
|
|||||||||||
| Smart Key Unit (SMK) |
|
|||||||||||
| Electronic Parking Brake (EPB) |
|
|||||||||||
|
Integrated Electronic Brake (IEB) (Pressure sensor) |
|
2.Symptom diagnosis
| Symptom | Suspected causes | Correction |
| Faulty engine start | Switch fuse, Relay fuse, Stop lamp switch, Stop signal electronic module, IEB, Each wire, Connector |
 Inspect waveform using an oscilloscope
on each part during vehicle acceleration/braking. (Refer to stop lamp switch
circuit inspection Procedures) Inspect waveform using an oscilloscope
on each part during vehicle acceleration/braking. (Refer to stop lamp switch
circuit inspection Procedures) Refer to the relevant repair procedures
of the part when something abnormal is discovered in the waveform (Refer
to the repair procedures of the relevant part and if necessary replace it) Refer to the relevant repair procedures
of the part when something abnormal is discovered in the waveform (Refer
to the repair procedures of the relevant part and if necessary replace it) |
| ESC OFF light illuminated | Switch fuse, Relay fuse, Stop lamp switch, Stop signal electronic module, IEB, Each wire, Connector | |
| P0504 | Switch fuse, Relay fuse, Stop lamp switch, Stop signal electronic module, VCU, Each wire, Connector | |
| Stop lamp does not working | Switch fuse, Relay fuse, Stop lamp switch, Stop signal electronic module, ECM, Each wire, Connector | |
| Stop lamp always turns on | Stop lamp switch, Stop signal electronic module, Wiring short circuit, Damaged fuse |
3.Refer to DTC guide when the related DTC codes are displayed.
Removal
1.Disconnect the battery negative ( - ) terminal and the service interlock connector.(Refer to Battery Control System - "Auxiliary 12 V Battery - 2WD")(Refer to Battery Control System - "Auxiliary 12 V Battery - 4WD")
2.Remove the knee air bag.(Refer to Restraint - "Knee Airbag (KAB)" )
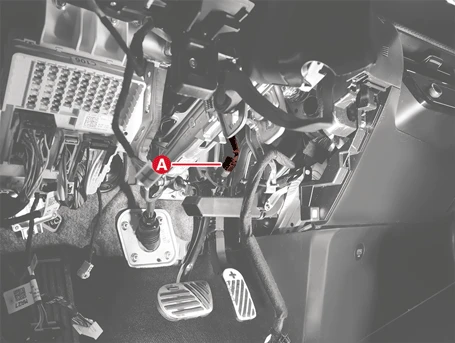
3.Disconnect the stop lamp switch connector (A).
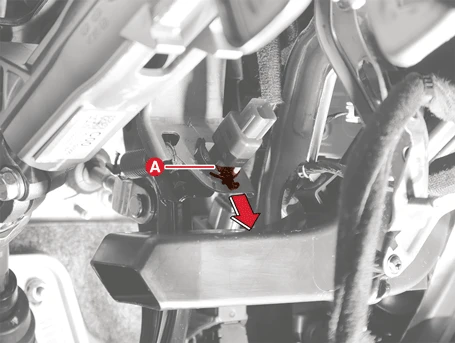
4.Pull the locking plate (A) in the direction of the arrow.
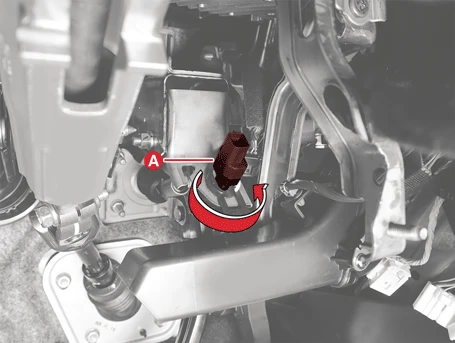
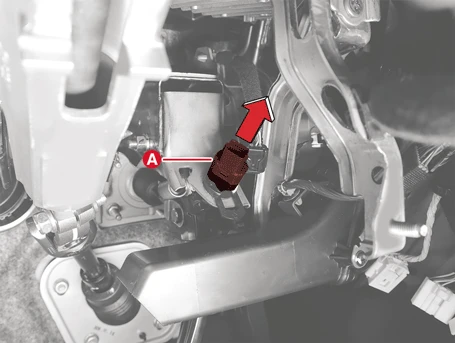
5.Turn the stop lamp switch (A) counterclockwise about 45 degrees and remove it.
Installation
1.Install in the reverse order of removal.
2.Check the stop lamp switch clearance.(Refer to Stop Lamp Switch - "Inspection")
Clearance inspection
1.Check the stop lamp switch clearance (A).
Stop lamp switch clearance (A) : 1.0 - 2.0 mm (0.04 - 0.08 in.)
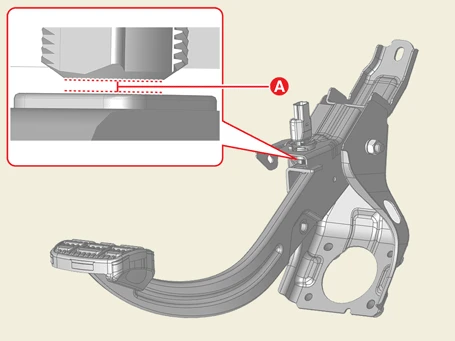
2.If the clearance exceeds the standard, remove the stop lamp switch and check for damage to surrounding parts such as mounting clips.(Refer to Brake System - "Stop Lamp Switch")
3.If there is no damage, install the stop lamp switch and recheck the clearance.
Component Inspection
1.Inspect the removed stop lamp switch following procedures below.
(1)Confirm a normal connection on component side.
– A confirmation can be made to see if the connector has been secured properly and if a connection mark is present.
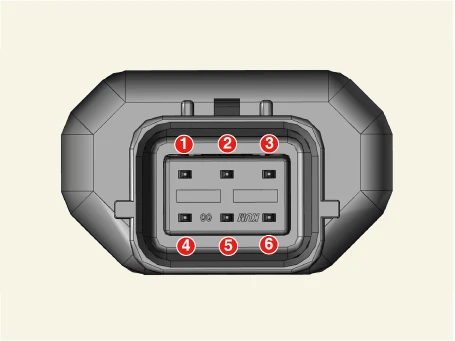
1. IGN / ICU Junction block
2. BS / Brake test switch
3. -
4. B+ / ICU Junction block
5. BLS / Brake lamp switch
6. GND / Ground
(2)Perform basic checks and wiring checks.(Refer to DTC guide - "Component Inspection")
(3)Diagnose using KDS after replacement or reinstalling.(Refer to DTC guide - "Component Inspection")